Home
Home INFORM®
 Curriculum Matrix®
 Total Reader™
 SchoolNomics™
 Partners
INFORM Assessment - EZScan Training Guide-Pre-Slug
Scan and Score
INFORM
Assessment
TRAINING GUIDE
EZScan
Table of Contents
INFORM Assessment PRE-SLUG
PRINTING ANSWER SHEETS
EZSCAN 2.0
EZSCAN SCANNING PROCESS
VIEW BATCH INFORMATION IN INFORM Assessment
INFORM Assessment Pre-slug
In the Scanning Center, users can pre-slug and print answer documents. INFORM Assessment has the ability to generate the information necessary (i.e., student ID, test ID) to populate answer sheets for scanning.
Please note that EZScan answer sheets can only be used with assessments containing 50 or fewer multiple-choice questions (with an option of up to two Rubric Score questions).
To Preslug answer documents, take the following steps:
- Click the Scanning Center sub-link.
- Choose PreSlug from the Display drop-down menu.
- From the PreSlug box, click the Assessment link to select the test.
- Locate your assessment and click on the radio button to the left of the Test ID.
- Click the Done button once you have selected your assessment.
Note: Selecting the correct Test ID is critical to ensure valid student results. Please ensure that the Test ID is correct before proceeding to the next step. - Select a test date by clicking on the calendar icon to the right of the Test Date field.
- Users may choose to include class names/class subjects by placing checkmarks, as appropriate. These selections are optional.
- Select Add Students in the Actions drop-down menu, located in the pane on the right side of the screen, and click the go button.
- The Student Selector will appear as a pop-up window to select the enrollment of students taking the assessment. Click the yellow edit button to set the enrollment. Choose the appropriate enrollment to the grade level and class (if necessary), and click the Continue button.
- For secondary schools, users have the option of filtering the class list by subject. To do so, place a check mark in the Filter by Subject box in the upper right corner of the Teacher List box.
- Select one, more than one, or all classes, and click the Add Students button.
Printing Answer Sheets
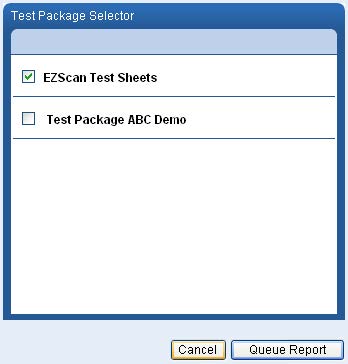
- Choose Create Test Package from the Actions drop-down menu, and click the go button.
- The Test Package Selector will appear as a pop-up window. Users can choose to print EZScan test sheets only, or a complete test package.
Note: A test package includes a test proctor instructor sheet, a copy of the actual assessment, and the pre-slugged answer sheets.
- After making a selection, users can click the Queue Report button for printing. The Report Queuewill appear as a pop-up window. Please refer to Page 7 of this training guide for information specificto the Report Queue.
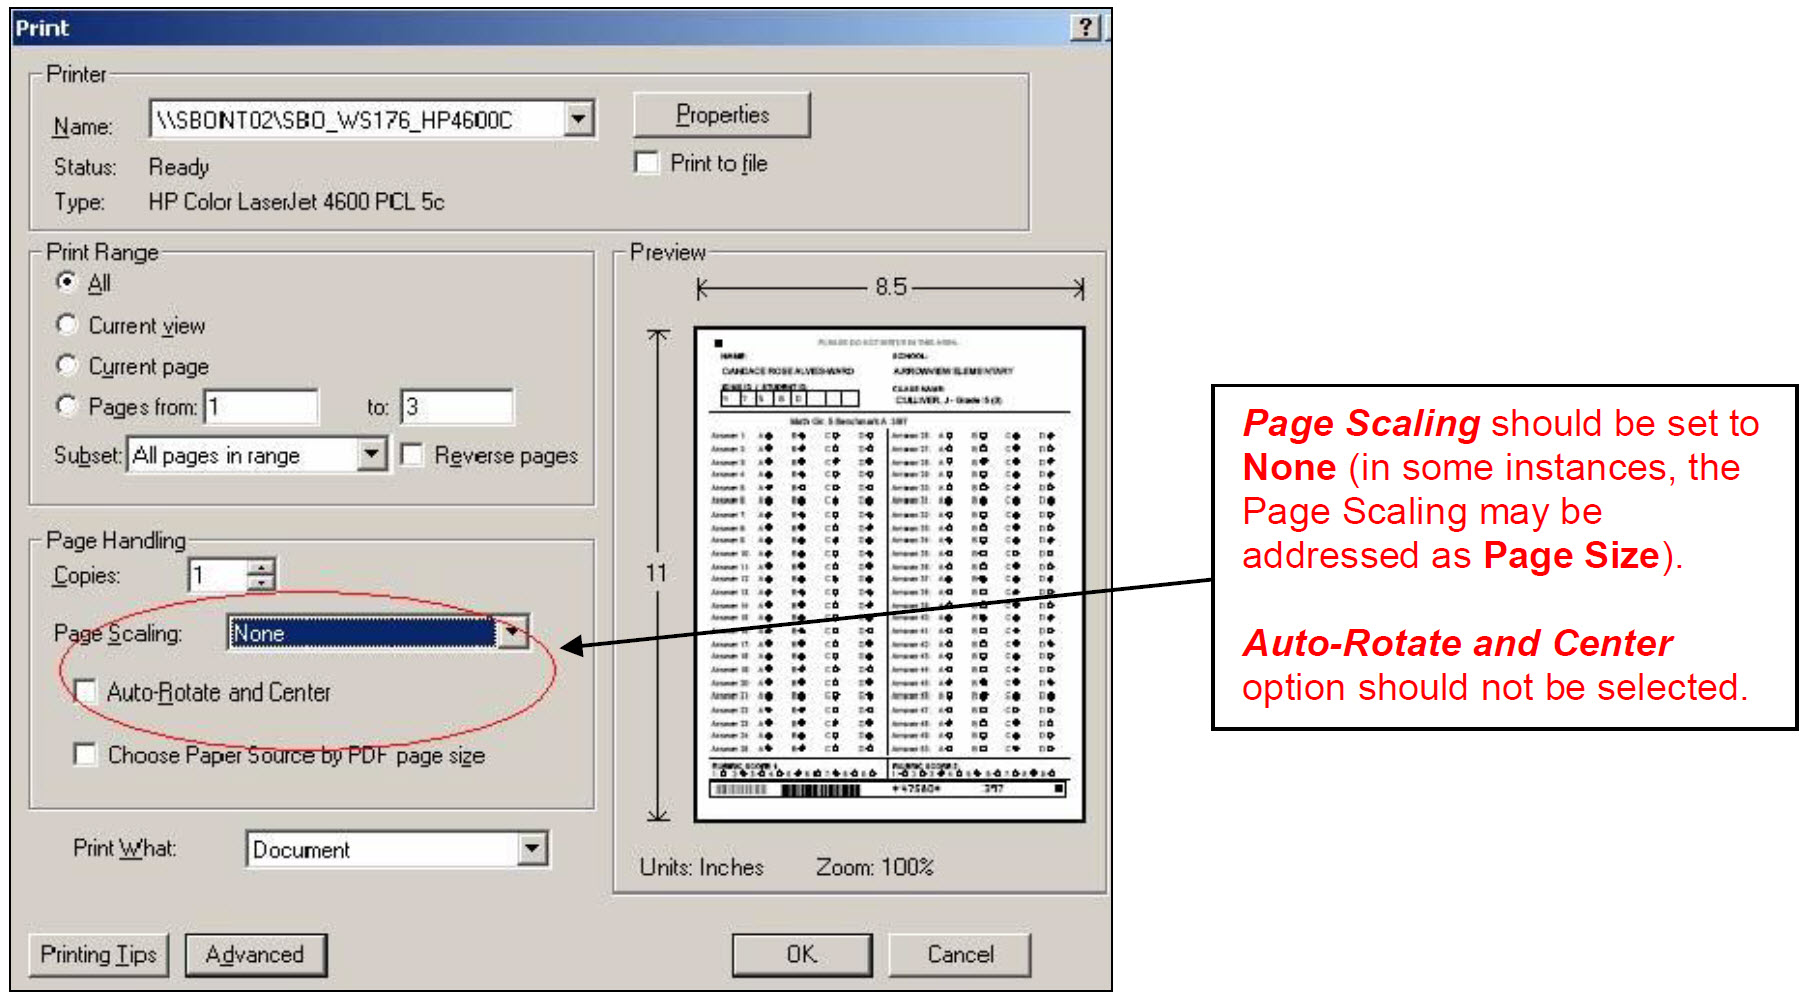
- Confirm the following settings/items before printing:
- Page Scaling should be set to None (see image below). Note: In some instances, the PageScaling may be addressed as Page Size.
- Auto-Rotate and Center should not be selected (see image below).
- The printer must be able to handle a minimum resolution of 800x600.
- The printer should be a laser printer (do not use a Dot Matrix or inkjet printer).
- Make sure there is enough ink in your printer to print all answer sheets clearly without blankor light spots.
- Use standard white paper stock (not shaded, color, or heavily recycled paper).
- Click the OK button to print your pre-slugged answer sheets.
Note: Do not make photocopies of the answer sheets. Use printed copies only.
EZSEZS cancancan 2.0
EZScan is a separate application that works in conjunction with INFORM Assessment to scan and upload results. Note: EZScan is not currently compatible with Mac operating systems.
Once your EZScan software has been installed, follow these steps to scan your answer sheets:
- 1.Ensure scanner is Twain Compliant. Refer to your scanner’s technical specification.
- Make sure the scanner’s resolution is set to 300x300 dpi (see the scanner’s manual for furtherinstructions).
- Make sure the scanner is set to scan in black and white, and not grayscale (see the scanner’smanual for further instructions).
- Open EZScan by clicking on Start > Programs > EZScan from your Windows menu.
- Enter your user name and password and click the Login button.
EZScan Scanning Process
To begin scanning answer sheets, take the following steps:
- 1.When scanning for the first time, change/confirm the settings below. These settings should be revisitedperiodically to confirm that they are in place.
- Click on Settings > Select Scanner and make sure the correct scanner is selected.
- Enter the number of pages to be scanned, or click the Disable Page Count button to bypass pagecount.
Note: If you choose to enter the number of pages to be scanned, you must enter the exact number ofpages. Otherwise, an incorrect reading will occur, and a re-scan may be required. - Before scanning your answer sheets, ensure the following:
- All answer sheets are EZScan pre-slugged sheets, not hand-written.
- All answer sheets are pre-slugged with the same Test ID.
- All forms are legible.
- All cornerstones are visible.
- None of the answer sheets are wrinkled or folded.
- The answer sheets are placed on the scanner according to your scanner requirements.
- The scanner’s glass is clean and free of blemishes.
- Click the Scan button.
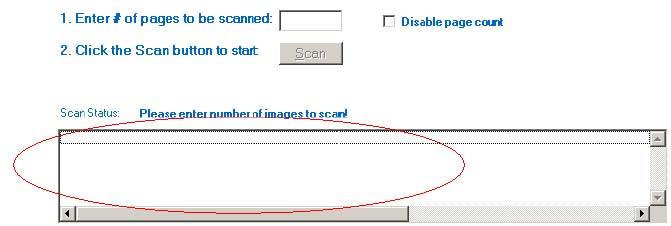 Note: EZScan will display the scanning process as well as the total number of scanned documents received. Results will display in the section circled above.
 - Once all pages have been scanned successfully, the Scan Status box will update. Users can repeatthe scanning process until all batches are scanned, and then close the EZScan application.
View Batch Information in INFORM Assessment
To view the batch results or batch errors, follow the steps below:
- Login to INFORM Assessment.
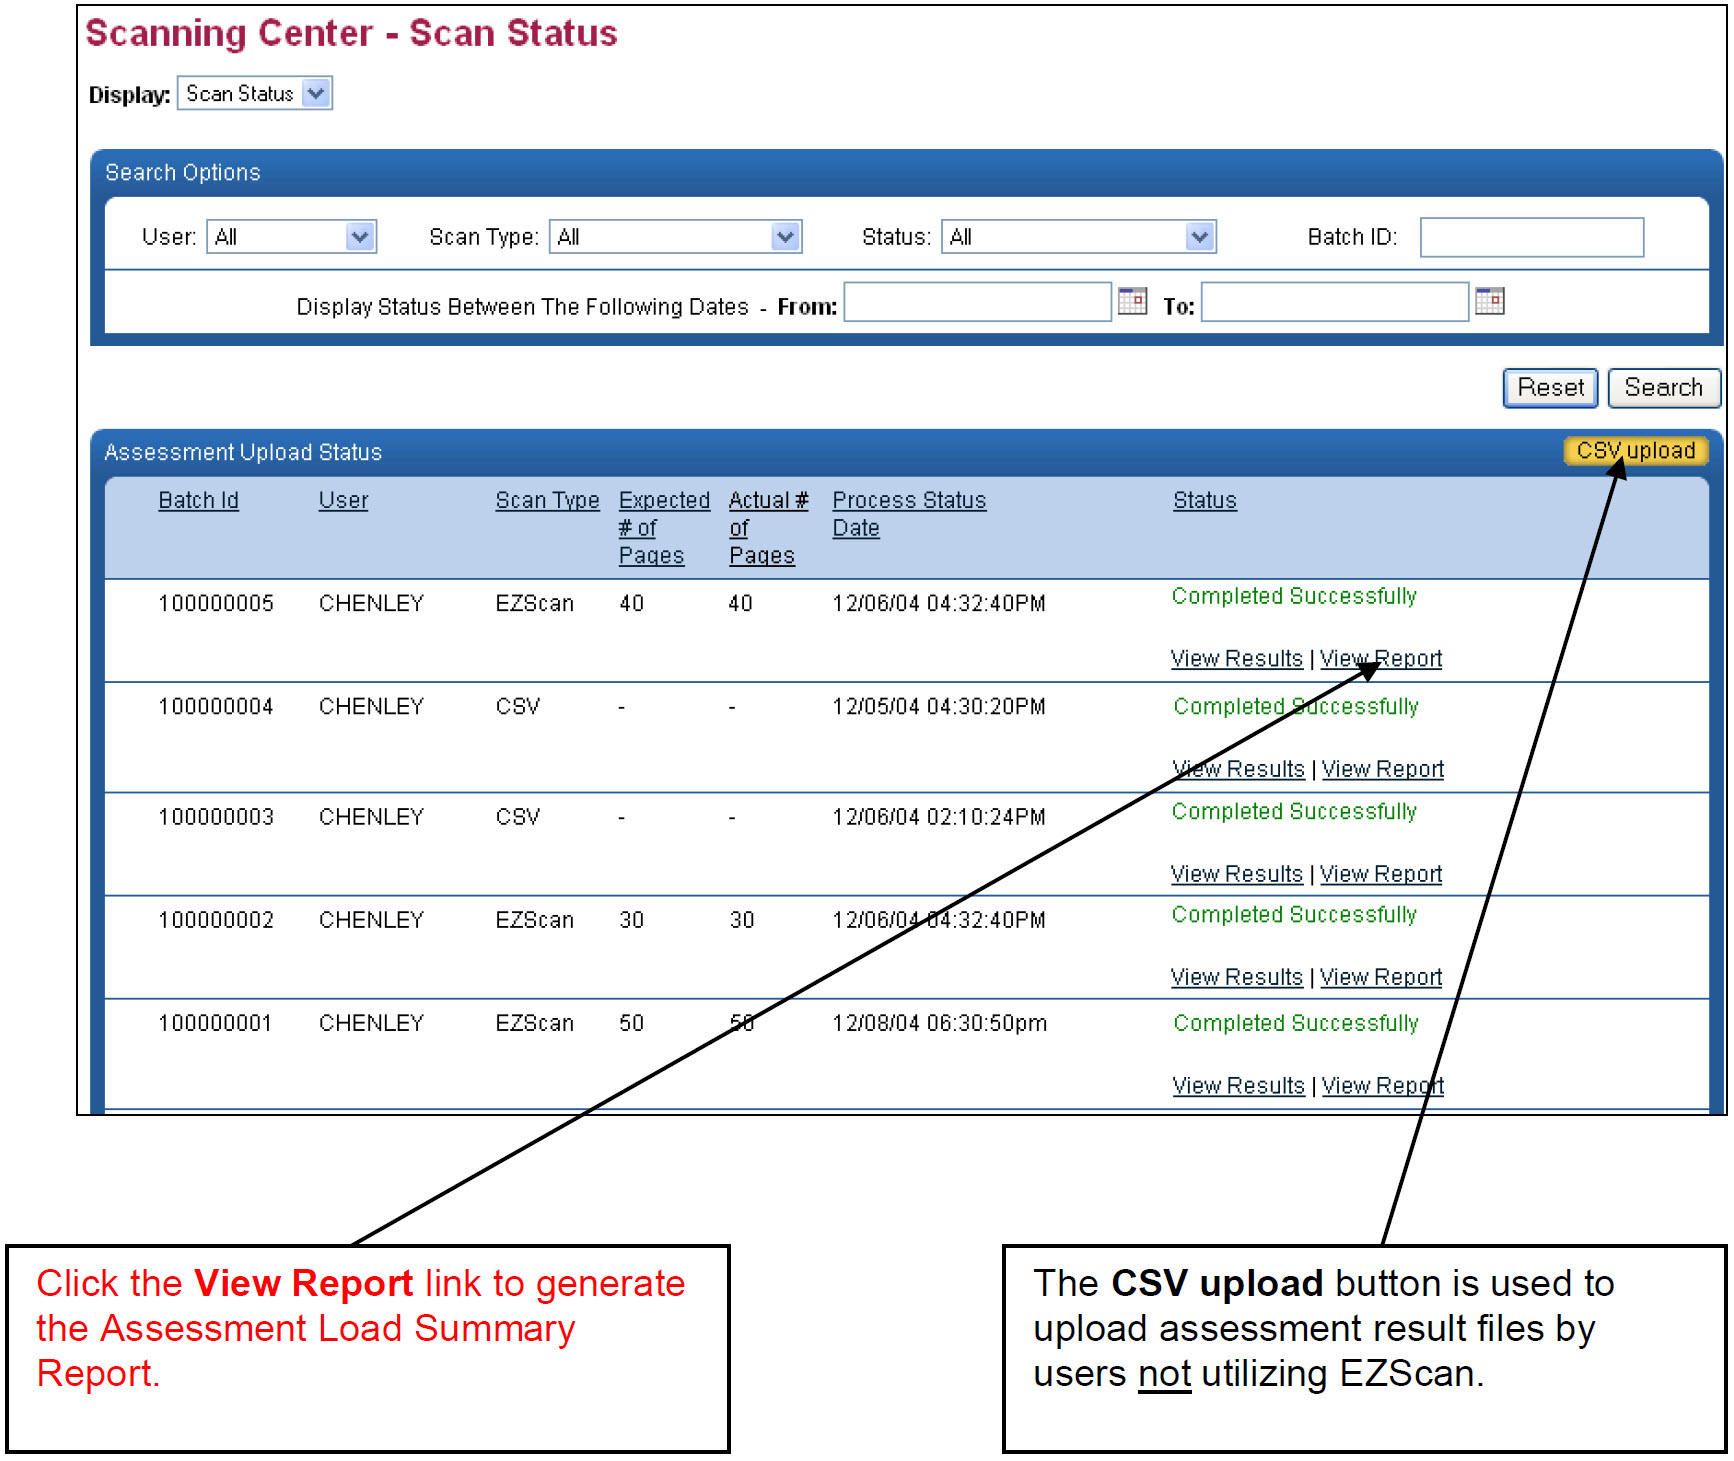
- Select the Scanning Center sub-link, and then select Scan Status in the Display drop-down menu.
Note: To view the batch(es) scanned, users must be logged in as the user who signed into EZScan. Example: if user A scans in all the sheets, and user B logs into INFORM Assessment, user B will not be able to see any of the batch status/information. - The status of a scanned batch is displayed. Review the Scan Status to determine batch process statusand whether any errors have occurred.
- If the Status field displays Completed With Errors On Pages!, begin the online verification process to verify any uncertain fields.
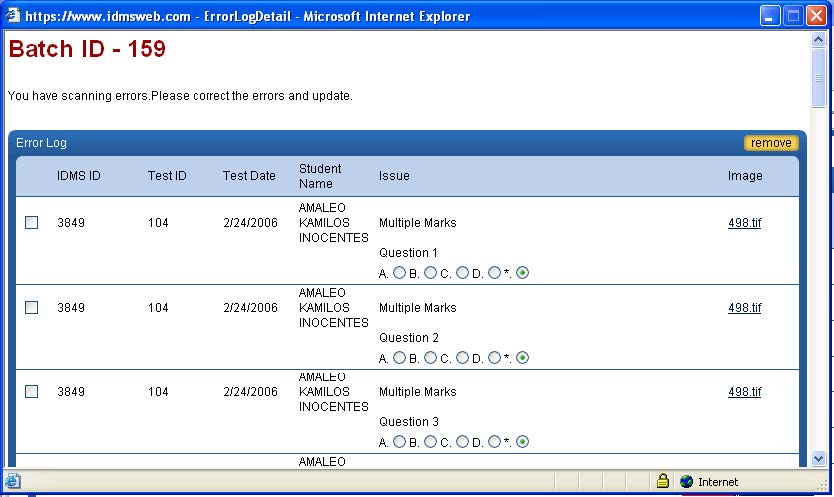
- Users should click the image link (TIFF file) to view the answer sheet. They can then make theappropriate selection that corresponds to the student’s choice.
- Once online verification is completed, users can click the Save button at the bottom right of thewindow. The status of the batch will update to Completed Successfully.
- If the error is caused by a missing Test ID, users need to select the missing data from the Assessment menus (links will appear in the Error Log Detail screen). They cannot type in missing information manually, as there are no text fields.
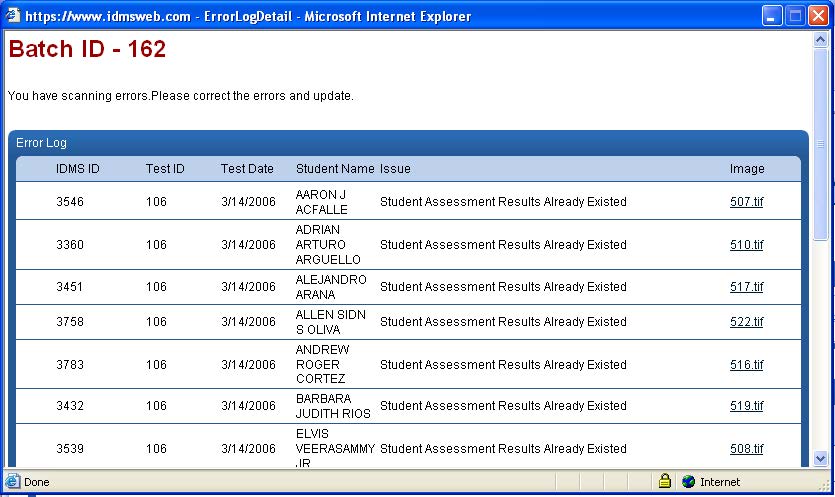
- EZScan will prevent duplicate results from being uploaded. In the event of a duplicate upload, INFORM Assessment will display an error message. The Error Log Detail will look similar to the following image:
The Assessment Load Summary Report is available to assist in identifying errors in the upload process for local assessment results.
To generate the Assessment Load Summary Report, users can click the View Report link located in the Assessment Upload Status window.